Custom Menubars-Determine Your Need
Before creating the custom menubars, it is a good idea to do a little homework, and figure out how many you will need, and what their content will be. You will want to determine the header content for each menubar, and what the item content will be.
Header Content
The header content is visible on the menubar at all times. When you hover your mouse cursor over them, they drop down to reveal the item content. The header content does not usually have a click event associated with it, although it is possible to do so.
Item Content
The drop-down item content is usually where all of the navigation is accomplished. Each item content has a onClick event assigned to it. This onClick event typically is given a JavaScript statement to execute when the content is left-clicked. Any valid JS code can be entered here. The click event JS code usually is structured to accomplish navigation.
 Fig. 5 Header and drop-down items of menubars
In Fig. 5 above, you can see the two different levels displayed, labeled in red text.
Developing a List
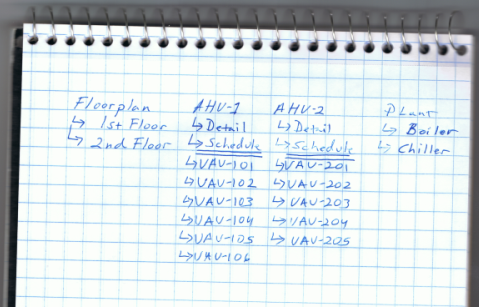
When determining what menubars you will need, the best way is to write up a list. Think about how the mechanical systems match up to each other, and come up with some header menubars based on those groupings. Then add the item content, which should be webviews that you plan on building, or links to webpages outside of ASI WebLink.
 Fig. 6 Development list of menubars showing content at both levels
In Fig. 6 you can see that I planned on having four custom menubars, Floorplan, AHU-1, AHU-2 and Plant. I then defined the item content for each custom menubar. Here are my menubars in a bulleted list.
- Floorplan
- 1st Floor
- 2nd Floor
- AHU-1
- Detail
- Schedule
- -Separator-
- VAV-101
- VAV-102
- VAV-103
- VAV-104
- VAV-105
- VAV-106
- AHU-2
- Detail
- Schedule
- -Separator-
- VAV-201
- VAV-202
- VAV-203
- VAV-204
- VAV-205
- Plant
- Boiler
- Chiller

